Lussekatt, Swedish Saffron Bread

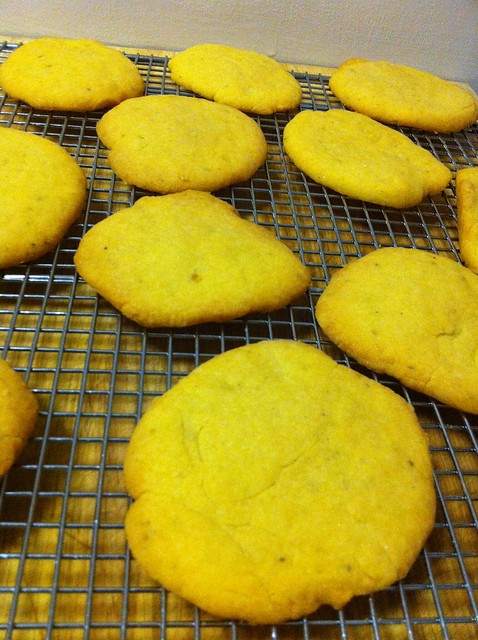
Francine was coming over from Connecticut for brunch so I wanted to bake something that would bring back the Stockholm memories we shared together earlier this year. This traditional Christmas bread, or lussekatt, gets its yellow-orange color from saffron threads and is baked into S-shapes with raisins. They’re yeasty–a big plus to me–but also sweet (I cut down the sugar by half) and good with tea in the late afternoon. Of course, it’s the middle of summer here in New York City and Francine brought a bottle of Belvedere Bloody Mary vodka to mix drinks, but just like our Sweden trip, brunch broke all established rules.

I made other alterations to this Saveur Magazine recipe besides cutting down the sugar. I didn’t let the S-shaped dough sit for another 30 minutes while I preheated the oven. I also didn’t mix the beaten egg with a splash of water before brushing the tops with it. I’m not a baker, so I didn’t notice the difference: my saffron buns turned out pretty well. I think the Swedish gnomes would be proud.

Ingredients:
2 1/4 oz packages of active dry yeast
2 cups whole milk, heated until warm to the touch
2 tsps saffron threads
1/4 cup plus 1 tsp sugar
6 1/2 cups flour
3/4 tsp salt
3 eggs
12 tbsps unsalted butter, room temperature, and cut into 1/2-inch cubes
golden raisins

1. In the bowl of a stand mixer fitted with a paddle, mix together yeast, milk, saffron and 1 tsp of sugar. Let sit until foamy, about 10 minutes. Stir in remaining sugar, flour, salt and 2 eggs. Mix on low until dough forms and gathers around the paddle.
2. Replace the paddle attachment with the dough hook and add butter. Knead on medium-high speed until dough pulls away from the sides of the bowl, 8 minutes.
3. Grease a large glass bowl with butter. Transfer dough to the greased bowl and cover with Saran wrap. Let sit in a warm place until it doubles in size, about 1 hour.
4. Divide dough into small pieces and roll each piece into a medium-length rope. Form each rope into an S-shape and then roll each end into a tight spiral. Place buns 2 inches apart on two baking sheets lined with parchment paper. Place raisins at the center of each spiral.
5. Preheat oven to 400º while lightly beating the remaining egg. Brush each bun with beaten egg. Bake until buns are golden brown and cooked through, 15 minutes.

Related post/s:
Our travel story in Stockholm, Sweden
Wow, a 2005 recipe for Swedish meatballs

Shiso Leaf Buns

A few weeks ago, I decided that the only way I would bake more is if my heavy KitchenAid mixer is actually taking up real estate on top of the kitchen counter. That way, it can stare and taunt me: Bake, bake, bake! I realized that whenever I have the urge to bake, I fall into the lazy hole after I open the cabinet door that keeps the mixer: I have to carry that big thing out of there? Never mind. But I’ve baked twice in the last couple of weeks and so far I’m amazed at how easy it is to knead the dough and transfer it into a bowl to let it rise. The cleanup of all the mixer parts was what always made me stay away from baking–not so anymore.

A few months ago, I planted several shiso leaf seeds I bought from the Kitazawa Seed Company. I knew they would grow easily and I imagined a lot of sashimi wraps during the summer months. I now have more shiso than I need, so when I found a photo of scallion-cilantro buns from a magazine, I thought I would adapt the recipe since they’re not as spicy as what you usually eat in Japanese restaurants. Perhaps it was the growing condition in my garden–the humidity and summer thunderstorms have changed the way my shiso leaves taste. The one improvement I would make if I bake these buns again is to add a sprinkling of rock salt on top of each.

You can get fresh shiso leaves from your favorite Japanese grocery store, but perilla or sesame leaves are great substitutes and would be less pricey and tangy.

Ingredients:
2 tsps active dry yeast
2 tsps salt, divided
2 tsps sugar, divided
1 3/4 cups plus 3 tbsps all-purpose flour
4 tbsps unsalted butter, chilled, cubed
1 large egg, plus 1 yolk
2 cups shiso leaves, julienned, then finely chopped
1/2 cup sesame seeds
1 tbsp black sesame seeds
olive oil

1. Line a baking sheet with parchment paper. Sprinkle yeast, 1 tsp salt and 1 tsp sugar in a small bowl with warm tap water. Let stand until mixture bubbles, about 10 minutes.
2. Place flour, butter, remaining 1 tsp salt and remaining 1 tsp sugar in bowl of a stand mixer with dough hook attached. Rub in butter with fingertips until mixture resembles coarse meal. Beat in egg, extra yolk and the yeast mixture, scraping down sides.
3. Knead on medium speed until dough is soft and smooth, about 5 minutes. Form dough into a ball; transfer to a large, lightly oiled bowl. Cover and let rise until doubled in size, about 1 hour.
4. When ready to bake, preheat oven to 350º. Mix shiso with the sesame seeds in a small bowl. Using a rolling pin, roll dough into a rectangle. Spoon shiso mixture evenly onto center and spread mixture to corners of dough. Working from one short edge, roll dough rectangle into a cylinder.
5. Cut cylinder into 3/4″ dough swirls. Transfer dough swirls to prepared baking sheet; brush with oil. Bake until golden brown, no more than 30 minutes.

Related post/s:
Making your own maki rolls
Shiso oil recipe

Unsweetened Peach Cobbler

Shauna introduced me to this Paula Deen recipe last year. I had invited her to come down for dinner and she brought a ceramic pot filled with batter and peaches. Because I’m not a baker, I always welcome guests bearing desserts. It was delicious with vanilla ice cream as soon as it came out of the oven, but the bread was even better the next day. It had sucked all the peach juice and made it less sweet. I was even skipping the fruit and just going for the starch.

When it was my turn to make dessert, I asked Shauna for the link to the original recipe and was completely turned off at how much sugar and butter was used. No wonder it had to be baked in a deep pot. I made my version in a shallow pie pan, cut the ingredients in half and–gasp–cut the sugar altogether. I added a tad of sweetness by drizzling in some of the peach syrup from the can just before serving. It might not satisfy your sweet tooth, but it probably won’t make you sick of it either. (If you must, use 1/4 cup of sugar and that should be enough.)

Ingredients:
1 cup of flour
1 1/2 tsps of baking powder
1/2 tsp of salt
1 cup of milk
a small knob of butter, melted in the microwave
canola oil baking spray
1 small can of sliced peaches in heavy syrup
cinnamon powder

1. Preheat oven to 350º. In a large mixing bowl, combine flour, baking powder, salt and milk using a spatula. Add the butter and mix well.
2. Coat pie pan with a spray or two of canola oil. Pour in batter. Top with slices of peaches and spoon in some of the heavy syrup. Sprinkle with cinnamon powder.
3. Bake in the oven for 35 minutes or until the edges are browned. Serve warm with vanilla bean ice cream.

Related post/s:
This recipe from 2008 looks more like a peach crumble

Jalapeño Cheddar Biscuits

When Sheena sent me this recipe from Design*Sponge, I thought of it as the ultimate savory cookie. The process read easily enough so I decided to try it on Sunday and bring them to the office the next day. They were a hit, even for those who thought they wouldn’t be able to stomach the spiciness of the peppers. For lack of a better–and classier–description, they taste like Cheez-Its, only spicier.

I’ve made several edits to make the recipe easier to follow and renamed them biscuits because, let’s be honest, most people expect cookies to be sweet instead of savory. If you tell them you made biscuits, they’re more likely to try them. You don’t want to see the disappointment on your guests’ faces when you offer them cookies and then tell them they’re made of jalapeños.

I found it hard to make the cookie discs. I wasn’t sure if it was because I’m just not a baker, or if my dough was too wet. After cutting the dough into small discs using the rim of a wine glass, I still had to roll them into balls and then flatten them out because it wasn’t easy to pick them up from my counter. I liberally sprinkled extra flour to dry the rest of the dough up. When all was done, the kitchen smelled beautifully.

Ingredients:
1 1/4 cup all-purpose flour
8-ounce block of extra-sharp cheddar cheese, grated
1/2 cup butter, room temperature
1/2 teaspoon salt
1/2 teaspoon black pepper
1/4 cup pickled jalapeños, patted dry with a paper towel

1. In a large bowl, mix together flour and cheddar. In a food processor, combine butter, salt and pepper until thoroughly blended. Slowly add flour and cheese until dough clears the sides of mixer. Add the jalapeños for one last quick blitz. Don’t over-mix.
2. Shape the dough into ball and wrap in parchment or wax paper and chill in the fridge for about 20 minutes.
3. Preheat oven to 350º. When dough is chilled, flour your kitchen counter and roll out the dough until it is about a 1/2″ thick. Using about a 2″ circular cookie cutter or the rim of a wine glass, cut out circles and place on parchment-lined baking sheets. Bake in the center of the oven for about 13 minutes or until cookies are golden on top. Remove to a rack and let cool.

Related post/s:
Or you can just make a normal cookie

Macha Green Tea Pound Cake

I’ve never heard of blue eggs until I saw them from Holton Farms’ Web site the last time I ordered my CSA produce. Curious, I ordered a dozen even though they cost $7. After some research, I found out that the blue eggs come naturally from these Chilean chickens called Araucana that look like they have handlebar moustaches coming out of the sides of their faces. They’re super cute, but the eggs look even more beautiful and delicate.

I used two of them to replicate this green tea pound cake recipe from About.com. I edited it after trying it two times. Because there is no liquid involved, I thought it was wrong to say that you have to “pour the batter” in a pan–it was more like transferring each glop with my spatula than pouring. I also cut the sugar in half because I wanted the green tea flavor to stand out. Forty minutes made it too dense so I stuck with half an hour the next time and thought it came out just right.

When I brought the end product to work, everyone liked and ate it, but I made sure they knew it was a pound cake and not a sponge cake so that they’re not taken aback by the density of the bread. If you’d serve this warm and straight out of the oven, dust with a little bit of confectionary sugar to pretty it up.

Ingredients:
1 stick of butter
2 large eggs, lightly beaten
1 cup flour, sifted
1/3 cup sugar
1 tbsp matcha, or green tea powder
1/2 tsp baking powder
a small knob of butter for greasing the loaf pan

1. Preheat oven to 350º. Meanwhile, in a large glass bowl, melt the butter in the microwave for 1 minute. Cream with a spatula and slowly mix in the beaten eggs. Combine well.
2. Gradually add the flour with one hand while the other is making sure everything gets incorporated. Do the same with the sugar, the green tea powder and the baking powder. Transfer to a buttered loaf pan and gently pat even with your spatula.
3. Bake in the oven for 30 minutes. Remove from oven–the remaining heat should cook it in place–and let stand until it’s cool enough to serve.

Related post/s:
Maeda-En Shiki Matcha Green Tea Powder is on Amazon.com
Holton Farms is where I get my CSA produce from