Seared Scallops with Fava Beans

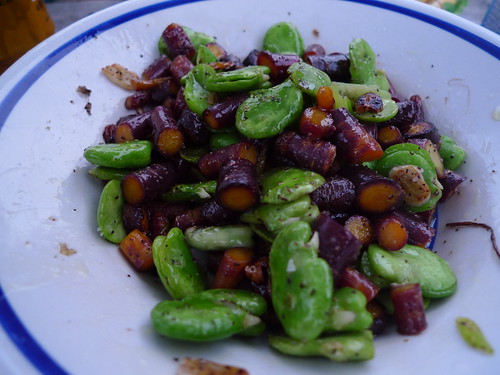
I’ve shelled fava beans before and I can’t say it’s my favorite thing to do in the kitchen, but I love them so much in salads that whenever the summer season starts, I always buy a few handfuls of them from Fairway or from any farmer stand outside of the city. If shelling raw, you have to do it twice: one from the pod and two from the casing. If you have access to a grill, it’s easier to grill them first and the beans come out of their casings much easier. I realize it’s not the season for fava beans anymore, but hey, bookmark this recipe for next!

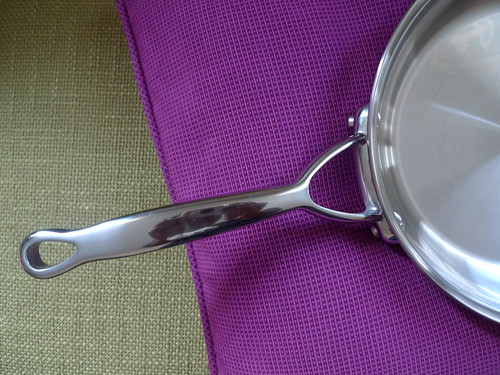
To sear the scallops, I used my new 10-inch skillet from Bonjour. I never owned a skillet without Teflon on the surface and I’ve survived this long in the kitchen, but now I know why it’s so much better for delicate food items like scallops and hardy meats like a beef steak: the skillet gets so much hotter faster and you get that satisfaction that your food is getting thoroughly cooked without overdoing it. The bonus part is that, since there is no rubberized handle or nonstick surface, you can finish cooking in the oven without having to turn the seafood or the meat.

Ingredients:
a few pieces of fresh scallops, dried with a paper towel
a handful of fava beans, shelled
1 bunch of young purple carrots, chopped
oil, salt, pepper

1. Using a large skillet, heat some oil until almost smoking. Sear scallops for no less than 5 minutes. They will not stick to the pan if your scallops are dry and if your skillet was hot enough. Gently turn them over with a spatula to cook the other side for another 3 minutes. Remove to a plate.
2. Keep the remaining oil in the skillet and add a little bit more and reheat. Toss fava beans and purple carrots. Sauté in high heat for several minutes until the fava beans are semi-soft. If you bought them from the farmers’ market, a little rawness won’t kill you.
3. Assemble to a plate and serve with seared scallops.

Related post/s:
Scallops are even better wrapped in bacon

Recommended tool/s:
Time to upgrade your skillets to Bonjour

Beet and Watercress Salad in Juniper Vinaigrette

I know my pantry is well-stocked, but it still surprises me sometimes when I find an ingredient that I’ve forgotten about and it turns out it would work with whatever I’m making. For this salad, from Los Angeles’ Street Restaurant, I needed juniper berries to make the dressing and I was surprised to see a small jar of it from the time I pickled a pig’s head. Really.

I’ve used them ever since for my pickles, but I never thought of them as part of a salad dressing. As soon as I smelled the aroma while crushing them, everything came together. How come I’ve never made a juniper vinaigrette before? I needed an apple and I found half an uneaten apple wrapped in Saran in the fridge. Walnuts? Leftovers, too. If you have raisins around, toss those in, too.

I don’t expect you to roast one beet for this salad, of course. Use your time wisely and roast a bunch of beets so that they’re ready for the week. I simply stored them in the fridge and made the salad two more times. One bunch of watercress served two people. For more dressing, just double up and refrigerate the leftover for up to a week.

Ingredients:
1 large golden beet, washed, dried with paper towel
1 bunch of watercress, thoroughly washed, dried with paper towel
half an apple, chopped
a handful of walnuts, toasted, crushed

For the juniper vinaigrette:
1 tsp juniper berries, crushed using a mortar and pestle
lime juice
oil, salt, pepper

1. Preheat the oven to 350º. Wrap the beet in aluminum foil and place on a roasting pan and roast for about 1 hour or until tender. When cool, peel and cut them into 1-inch chunks.
2. While the beets are roasting, make the vinaigrette: put all the ingredients in a glass jar with a screw top and shake to mix.
3. Assemble the salad by tossing the beets with the watercress and apple in a salad bowl. Drizzle with the vinaigrette and dust with the walnut pieces.

Related post/s:
I really pickled a pig’s head, see?

Pinakbet, Filipino Vegetable Stew with Shrimp Paste

My father’s from Ilocos Sur in the northern part of the Philippines and pinakbet, or pakbet, is one of his specialties. It’s also one of my favorite Ilokano dishes that he makes on a regular basis. Most recently, I watched as he made a pot full of Filipino vegetables at home and wrote down the recipe he’s had in his head ever since I was young.

I love how easy this recipe is to cook. The challenge is to find an Asian grocery store that carries all the vegetables, but you can surely substitute as long as you have the shrimp paste handy. Speaking of shrimp paste, or what we call bagoong, my father has tried every brand available out there, but has only been happy with Kamayan Sauteed Shrimp Paste. Because it’s cooked, it has a darker brown color compared to the usual pink shrimp paste and it’s less fishy and salty. Once you have all your vegetables in one pot, all you need is the shrimp paste and a few minutes to stew it in water.

Ingredients:
1 bittermelon, halved lengthwise, seeded, chopped
2 Japanese eggplants, chopped
1 pint of okra
1 small squash, harder skin removed, chopped
1 bunch Chinese long beans, chopped
1 large tomato, chopped
1 red onion, chopped
1/4 cup of Kamayan sauteed shrimp paste
1 pound shrimp, shelled, heads on

1. Put all vegetables in a large Dutch oven. Top with dollops of shrimp paste. Add 1 cup of water and let simmer, covered. When water is simmering, mix everything together, making sure that the shrimp paste gets distributed.
2. Cook for about 20 minutes or until squash is tender, adding a little bit of water to keep the stew from drying. Add shrimp during the last five minutes of cooking. Add more shrimp paste to adjust taste.

Related post/s:
Asia Food Market in Chinatown sells everything in this recipe including the shrimp paste
Try another Filipino recipe with squid
How about baby back ribs?

Beet and Beet Greens Salad

It’s really not the time to be using the oven but when I saw beets in the supermarket, I all of a sudden had a craving. So off I went home after watching Julie & Julia with three gigantic beets and their greens stuffed but peeking from my tote bag.

Have I told you my Belize beet story? I’ll tell you again anyway. In 2003, the Dr. and I went to the Cayo District in Belize and stayed in Ian Anderson’s Caves Branch where we rented a jungle cabana with the shower pail outside. Buffet meals were included and when it was time to eat, you had to sit with other guests in the mess room and make new friends. The staff was announcing the menu for dinner and everyone was quiet and paying attention. The second beets were mentioned, the Dr. and I–and I’m not exaggerating here–simultaneously squealed, Yay! Beets! out of the blue. I don’t know–it just came out. We had a big laugh about it, but I don’t think we made friends that night.

At home, I readied a bath of water for the greens to easily clean the soil off. I prepared the beets for roasting and turned the A/C on high. I wore disposable gloves when I peeled them just so I don’t stain my hands. I dropped the first batch of dressing and broke a glass jar, so I had to do it again.

The hour-long roasting and the peeling with disposable gloves have always turned me off when cooking beets, but I also come from the school of if-you-work-for-it-it would-taste-better. This salad really did.

Ingredients:
3 large beets, tops chopped off with an inch of the stalk intact
beet tops, harder stalked removed, thoroughly washed, chopped in half to fit a pot
a dollop of mustard
balsamic vinegar
oil
salt

1. Wrap the beets in aluminum foil and roast in the oven for an hour or until done. Check for doneness using fork; it should give but not too easily. Remove from oven and place on a chopping block. Open the foil to let cool.
2. In the meantime, boil some water and prepare an bowl of water with ice cube in the sink. Add the beet greens to the boiling water and cook for about 30 seconds. Remove to the ice bath to stop cooking. Squeeze out excess water and chop in smaller chunks. Loosen to a salad bowl.
3. Make the dressing. In a small glass jar, combine the rest of the ingredients and shake to mix.
4. When beets are cool enough to handle, peel by hand. Chop beets in manageable pieces and toss with the beet tops. Drizzle with dressing.

Related post/s:
Try beets with a poached egg
No-stain golden beets

Chicken Sausage Yogurt Salad in Pita Pockets

I discovered chicken sausages by accident. When we invited a few of our friends to our summer rental in Ulster Park upstate, I bought them for the lone vegetarian guest. I honestly thought they were vegetable sausages because the typeface of the packaging focused on the herbs and spices. Artichoke sausages it said; cilantro and garlic sausages, even. I just didn’t notice the smaller “chicken” word underneath. I blame bad design!

They came out of the grill and the meat eaters ate them all anyway. I liked them for the spices and adding them to a salad required less salt and pepper because of the flavor they already had.

I bought a few more during this week’s heat wave to pack a light and summery lunch to work. I used English cucumbers here which are not waxed and can be eaten with the peel–they’re the ones you see wrapped in clear plastic. When I ran out of pitas, I ended up just eating the leftover as a simple salad. You can use any plain yogurt for the dressing, but I found that the Greek kind was best because it’s less sour. Wrap the pitas tightly in foil and they make great picnic lunches for your group of friends–as long as they eat chicken.

Ingredients:
spiced chicken sausage with cilantro, sliced
whole wheat pita pockets, lightly toasted
1 small tub plain Greek yogurt
1 small English cucumber, diced
1 tomato, chopped
a handful of mixed greens
1 small red onion, thinly sliced
lemon juice
mint leaves, finely chopped
salt, pepper

1. Using a small skillet, fry chicken sausage over medium heat until golden brown. Set aside.
2. While cooking the sausages, combine all the vegetables and mint in a bowl as if making a salad. Season with salt and pepper. Toss with a dollop of Greek yogurt and mix well. Drizzle with lemon juice. Add chicken sausage and toss again.
3. Slice off the top edge of the pita bread to open. Don’t waste that piece; put it inside the pita, too. Spoon in the yogurt salad with chicken sausage.

Related post/s:
Saravanaa Bhavan has raita, or yogurt-based dip
Get your Greek fill at Kefi, one of my favorite Greek restaurants