Ham Hock Xiao Long Bao with Butternut Burst

I wanted to accomplish two things with this version of the Shanghainese xiao long bao, or soup dumplings: make my own dumpling wrap from scratch and put a spin to it by using butternut squash soup for October’s Supper with Strangers instead of the traditional stock made from pork skin and chicken broth. Although I was proud at making my first edibles ones without trying too hard, the soup didn’t burst as much as I would have liked. But now that I know that I’m capable of making them, I’ll take some other time to make the traditional version and make my Chinese friends proud.

Allow yourself some extra time to make the butternut squash soup and the ham hock filling first and save the dumpling-making a couple of hours before serving. (I made a whole batch of soup and only used 2 cups for the xiao long bao.) For my first try, I kneaded the dough by hand, but for our Supper, I found a pasta maker extremely helpful in making the dough as thin and pliable as I needed it to be. A small 2-layer bamboo steamer in Chinatown is $10 and it can fit about ten xiao long baos.

Ingredients:
For the roasted butternut squash soup:
1 butternut squash, peeled, seeds removed, sliced in half
1 carrot, chopped
2 ribs of celery, chopped
1 yellow onion, chopped
fresh thyme
1 tbsp powdered gelatin
oil, salt, pepper

1. Make the butternut squash soup. Drizzle some oil on squash and season with thyme, salt and pepper. Roast squash in oven until tender, about 30 minutes. Remove from heat and let cool. When cool enough to handle, scoop out the squash meat to a bowl.
2. Combine carrot, celery and onion in a large stockpot with enough water to cover. Bring to a boil. Simmer until carrot is soft. Add the squash meat. Season with thyme, salt and pepper. Cook and stir occasionally while mashing some of the vegetables with the back of a wooden spoon. Remove from heat and let cool.
3. Start with a small batch of the squash mixture and purée in food processor. Return each batch to another stockpot and simmer again. Add more water to make a soup consistency. Season to taste.
4. Transfer 2 cups of the soup to a small saucepan for the xiao long bao. Add powdered gelatin and let sit for 2 minutes. Stir bring to a simmer. Remove from heat and let cool. Pour into a small ice cube tray and refrigerate until ready to make the xiao long baos. Serve the rest as a soup starter another day.

For the ham hock:
3 smoked ham hocks, soaked in water overnight, then drained when ready to use
1 carrot, chopped
2 ribs of celery, chopped
1 red onion, chopped
3 bay leaves
1 small knob of ginger, peeled, thinly sliced
1 tsp soy sauce
1 tsp sesame oil

1. Make the ham hock filling. Combine ham hocks, carrot, celery, onion and bay leaves in a large stockpot with enough water to cover. Bring to a boil. Remove the impurities that rise to the top using a slotted spoon. Simmer for 2 to 3 hours or until the ham hocks are tender. When cooked, set the ham hocks aside and let cool. Discard the rest.
2. When cool enough to handle, remove the ham hock meat from the bones and roughly chop. In a small bowl, combine meat with ginger, soy sauce and sesame oil. Refrigerate until ready to make the xiao long baos.

For the xiao long bao wrappers:
2 cups of flour, and more for your work surface
1/3 cup of hot water
2/3 cup of room temperature water
5 leaves of napa cabbage

1. Make the xiao long baos wrappers. Sift the flour into a large mixing bowl. Add the hot water and incorporate with your hands. Add the other 2/3 cup of water and mix to make dough. On a floured surface, use your hands to knead the dough for 10 minutes or until it becomes soft, smooth and bounces back slowly when you poke with your finger. Cover with plastic wrap and let it sit for 30 minutes.
2. Divide dough into 3 portions. Using one portion at a time while rest of the dough is covered in plastic wrap, roll into a snake. Chop the snaked dough in 1-inch pieces. Feed each inch into a pasta maker and roll out, using thickest setting first and moving on to the 2nd and then the 3rd, until the dough is thin but pliable enough. I made one wrapper and assembled a xiao long bao one at a time to keep the dough from drying up.
3. Assemble the xiao long baos. Fill each wrapper with 1 tbsp of ham hock filling and a cube of butternut squash soup gelatin. Pinch and pleat the edges of the wrapper and twist to seal. Set assembled ones in a large bowl covered with a wet paper towel to keep moist until ready to steam.
4. Boil a large pot of water. Line each layer of the bamboo steamer with napa cabbage leaves. Place a few xiao long baos on each layer, cover and put on top of the pot of boiling water to steam for 10 to 15 minutes. They are cooked when translucent and moist.

Related post/s:
October Supper with Strangers photos on Flickr
The process of making xiao long bao photos on Flickr

Winter Squash and Apple with Orzo

A drive up to Massachusetts to visit old friends and see the foliage was canceled at the last minute after the Dr. was called in to work. He made up for it by changing the car reservations and driving us closer from the city and letting me drag him to Stuart’s Farm’s apple orchard and pumpkin patch. The apples were still out, but there was no picking that needed to be done to the pumpkins–you can just “pick” one from the batch the farmers had already selected.

The drive was beautiful though. We both gasped when we saw the colors of the leaves while driving over Croton Point Park. The water was as still along the reservoir. It was definitely fall and the night called for us to test the squashes we brought home with us. Use wild rice instead of orzo if you want this dish to be heftier.

Ingredients:
a small acorn squash, halved, seeded and cut into small chunks
1 apple, cored, halved, sliced
1 small sweet potato, peeled, cut into small chunks
a handful of shallots, peeled
1 cup of orzo
a handful of cilantro, finely chopped
a dollop of honey
lime juice
oil, salt, pepper

1. Toss the squash, potato and shallots in a large bowl with a splash of oil, salt and pepper. Turn out onto a large baking pan. Roast for about 30 minutes. Then remove from oven and add the apples. Using tongs, slip the squash and potatoes to make sure the other sides are browning, too. Roast for another 10. The squash and potatoes should be tender and the onions caramelized.
2. In the meantime, cook the orzo. Boil some water and cook the orzo for about 10 minutes. Drain and fluff with a fork to avoid sticking. Set aside until ready to assemble the dish.
3. In the meantime, make the dressing. In a small bowl, combine some olive oil, cilantro, honey and some lime juice. You might need to drop in a splash of warm water or two to dilute the honey. Season with salt and pepper.
4. To assemble everything, use a large bowl and toss roasted vegetables together with the orzo and the cilantro-lime dressing. I use my hands to make sure that the vegetables are evenly distributed.

Related post/s:
Part of my Mother Hen project: omakase bento #22
For warmer months, orzo is great with citrus

Spiced Turnips, Shalgam Masala

I can tell that the cold weather is here to stay with the most recent bounty from my CSA farmer share. Solid and heavy produce like apples, carrots, turnips and broccoli dominated the weight of my two carry-ons. I still have a jar of homemade kimchi in the fridge so I wanted to do something different yet familiar with the turnips. I turned to my copy of Monisha Bharadwaj’s India’s Vegetarian Cooking to try her spiced turnips recipe after I remembered doing a similar take on kohlrabi.

Ingredients:
4 medium turnips, peeled, chopped
1 large tomato, chopped
1 small onion, sliced
2 tbsps ginger-garlic paste
1 tsp cumin
1 tsp fennel seeds
1/2 tsp turmeric
1/2 tsp red chili flakes
a small handful of cilantro leaves, finely chopped
oil, salt

1. Heat some oil in a pot and sauté the onions until soft. Add the ginger-garlic paste and the chili flakes. Add the tomatoes and all the spices. Season with a little salt. Stir until well blended.
2. Mix in the turnips and add about 3/4 cup of water. Stir to combine everything. Cover and bring to a boil and then reduce heat to simmer for about 15 minutes or until turnips are tender.
3. Remove from heat and add in the cilantro leaves.

Related post/s:
I use a similar recipe using kohlrabi

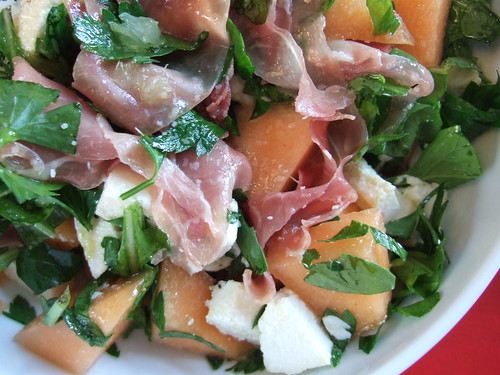
Melon Prosciutto Mozarella Salad

I’m spending the last weekend of the summer in Montauk and I wanted to make a salad last night that evoked that warm-but-chilly late afternoon air. We opened a bottle of wine and divided the duties in the kitchen: the Dr. cranked up the grill while I stayed indoors to prepare the side dishes. Earlier in the day, we stopped by the Amagansett vegetable stand to buy fresh produce. I was inspired by the fresh mozarella and the fragrant melons, as well as the spicy arugula and extra large parsley leaves. A quick stop at the deli got me some prosciutto to add.

Ingredients:
a small chunk of a melon, sliced in slightly larger pieces than the mozarella
a few pieces of prosciutto, torn
fresh mozarella, sliced in small pieces
a handful of parsley, roughly chopped
a handful of arugula, roughly chopped
juice from half a lemon
oil, salt, pepper

1. In a small bowl, make the dressing. Whisk in lemon juice with the olive oil and season with salt and pepper. Set aside.
2. In a salad bowl, toss in the melon cubes with the mozarella. Add in prosciutto and the greens. Gently dress with lemon juice and olive oil mixture so that the salad doesn’t muddle.

Related post/s:
Try bresaola if you don’t like pork

Crispy Vegetable Rolls

It felt great to be cooking in the kitchen again. After a summer hiatus, I signed the usual group up again for my omakase bento lunches. A day out in New Jersey playing $40 buy-in volleyball with some friends got me a slightly twisted ankle, so I couldn’t really stand too long to cook something elaborate. I did most of the work here sitting down. My legs also hurt from too much exercise in one day, so I ended up using my entire CSA share from last Thursday instead of going out to shop for more ingredients.

Ask any non-Filipino out there about Filipino food and they’ll most likely tell you about lumpiang Shanghai, or the fried egg rolls we adapted from the Chinese. Like any traditional recipe, this not only involves a lot of preparation, but also an almost precise way of frying to get them crispy. Wrapping them is a whole other business I’ve learned from my mother and from rolling other things–it takes practice.

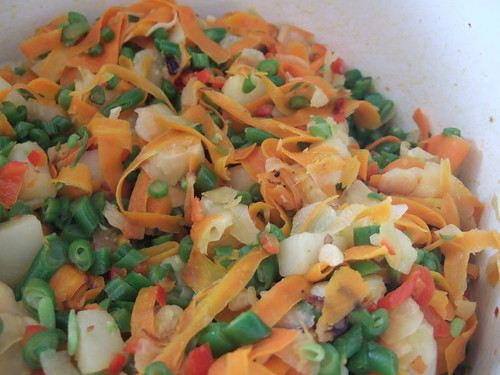
To cut down on chopping and cooking time, I used a peeler to get the vegetable meat as thin as possible. When ready to serve, all I had to do was fry them in medium-low heat to brown the wrapper since everything inside is already cooked. You can make these ahead of time and they keep in the freezer, stored in a Tupperware, for up to two weeks.

You can find spring roll wrappers or “shells” in the frozen section of any Asian grocery store. I like the Wei-Chuan brand because they’re springy enough to make the rolling easy, but also thin enough to brown quicker.

Ingredients:
spring roll wrappers, thawed and kept moist by covering with a wet paper towel while wrapping
1 pound of green beans, stringed, finely chopped
2 medium carrots, peeled, and then shaved using a peeler
2 kohlrabis, peeled, and then shaved using a peeler
2 potatoes, half-boiled, peeled, and then shaved using a peeler
1 red bell pepper, seeded, finely chopped
3 cloves of garlic, minced
red pepper flakes
oil, salt, pepper

1. Heat some oil in a large skillet. Sauté the garlic until light brown. Sauté all the vegetables, adding the ones that take longer to cook. In this case, green beans first, then kohlrabi, followed by the carrots and the red bell pepper. Add in the cooked potatoes 2 minutes before turning the heat off. Season with chili flakes, salt and pepper. Set aside.
2. Wrap and roll. On a chopping block, lay out one of the wrappers flat. Spoon a little bit of the vegetable mix onto the bottom end of the wrapper. Fold that end over to cover the stuffing and then fold half an inch from the left and the right over to seal the sides. Continue to fold over the bottom until you make a roll. Set aside with the opening side down to keep it closed until ready to fry. Do this until you’re out of vegetable mixture or wrappers.
3. When ready to fry, heat some oil in a shallow skillet. When oil is almost smoking, slowly add each roll to fry with the opening side down to keep them closed. Using tongs, gently turn each roll over to cook the other side. Both sides should only be a lightly toasted color.
4. Remove each roll to a stainless steel colander. They will sweat and lose crispiness if you put them on paper towel right away.

Related post/s:
Part of my Mother Hen project: omakase bento #16